A lot of small businesses now use Facebook to set up a Page. It's a fantastic tool Facebook has provided to help people have an online, social media presence for free. One of the fantastic features of Facebook Pages is the schedule post's option. I am someone who likes to investigate new features as they appear and try to learn and understand how they work. At first I wasn't thrilled with scheduling, but my opinion has since changed now that I understand how it works better. Here is a basic run down of how it works so that you can try using it on your Facebook Page.
First things first, you need to decide if you want to schedule a Status, or a Photo/Video. This process works the same regardless of what you select. In this instance I have chosen to just schedule a good morning status for tomorrow morning. So just type in your content and add your photo/video as you normally would.
Just a little bit of information about content & reach. The algorithms of Facebook are always changing. Previously you would have excellent reach with status posts, and the reach on photo uploads, or if you were to share a link, was horrible. Without boring you with the details Facebook is beginning to change this around. You may have noticed already (I know I have) but photo's and links are achieving better organic reach. A tip that was given by a FB marketing guru was to post 2 photos instead of 1. I have been experimenting with this and have been pleased with the results thus far. Maybe you could give it a go too!
Ok sorry, back to scheduling. So type in your text and add your photo or video as you normally would. BUT! Do not hit post. This is where you do something differently.
Under your status bar in the left hand corner is a small blue clock. Click on that clock and it will open up your scheduling options.
First, select the date you want to schedule your post for by clicking on the little red & white calendar icon which is next to today's date. You can schedule for later in the day, the next day, next week, next month or next year!! In this instance I selected for the next day.
Next you need to click on "Add a Time" to the right of the date selector. Just start typing in the time you have in mind and it will pop up with some options for you. You can select from the options, or if you wish you can type them all in yourself.
Then hit SCHEDULE.
Once you have successfully scheduled your post, this window will popup on your screen. It recaps the scheduling information for you to do a post scheduling check up to make sure you've selected the correct time & date. If you need to adjust the time or date, just click on "View Activity Log" and your post will be there. There is a drop down menu in the same box as the post and you can select to edit or delete the scheduled post.
You can see in the bottom left corner "Schedule another post". Go ahead and click there if you have several posts you are ready to schedule ahead of time.
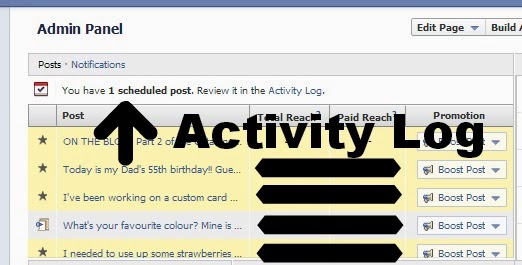
After you have finished scheduling, if you would like to look back over your posts, or you need to edit them after exiting out of the popup message pictured above, you can access them through your Admin Panel. It is right at the top so you will be able to find it easily. Just go into Activity Log and all your scheduled posts will be there.
NOTE: You can schedule posts from Android & Apple devices also. You just need to download the Facebook Pages Manager App and you are good to go. Once you type in your status and added in your photo, once again just click on the little clock icon, and select the date & time you wish to post.
I hope this has been helpful! Just for fun, come join in on the crafty fun on my Facebook page.


2 comments:
Thankyou so much!
This will help alot of people
This was very helpful thank you! And I will have to try that 2 photos thing! Hugs Julie x
Post a Comment